
Setting up Apache Solr multicore / Jetty on Windows 7
Initial setup
We to deploy Apache Solr to Jetty or Apache Tomcat especially when know that SolR has choosen Jetty as a Servlet container. Probably this choice is because it is "light" and can be easily embedded on the Solr distribution... so you can immediately have a running Solr server without requiring any other Servlet container (such as Tomcat, etc.). In terms of performance, not sure there will be such a big difference. Probably this depends on your own setup, for example in "development" I use Jetty, in production I use Tomcat, since I already am using it for other applications... In other hand, you can stop jetty service without affecting other web application. In case of stopping of Tomcat service all web applications on server are affected .... So for this tutorial we will use Jetty which need
- Ensure Java version 1.7 or higher is present on the machine (java -version on cmd screen). If not, download it from http://www.java.com/ (Java 7 is also known as 1.7).
- Download latest Solr (here Solr 4.9.1.zip) and unpack it somewhere.
- Create a directory where your Solr configuration and Jetty will live (e.g. C:\Solr, which we will refer to as <_SOLRDIR_>).
- If you don’t have Solr configuration defined yet, you can just copy Solr’s own example\solr directory to <_SOLRDIR_>, such that solr.xml is just inside <_SOLRDIR_> directory.

- Under the <_SOLRDIR_>, create subdirectory called jetty.
- Copy the following directories and the files into the jetty subdirectory from the Solr’s example directory:
- contexts
- etc
- lib
- logs
- resources (Solr 4.9+)
- webapps
- solr-webapp
- start.jar
- From the command line in the jetty directory, run the Solr server to make sure it works:
- java -Dsolr.solr.home=.. -jar start.jar
- Ensure that Solr is accessible at: http://localhost:8983/solr/
- Stop the server (Ctrl-C)
- In case of multicore configuration, copy multicore folder to c:\solr (if you want to add cores see end of this topic):
- java -Dsolr.solr.home=../multicore -jar start.jar
- Ensure that Solr is accessible at: http://localhost:8983/solr/
- Stop the server (Ctrl-C)
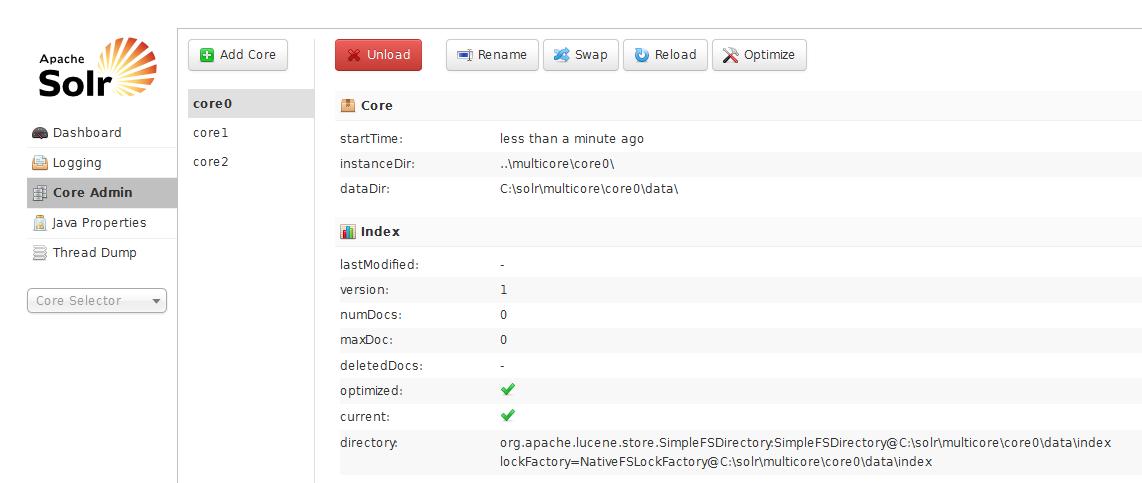
- Here is what you see when adding a core2 to SolR

Jetty Service setup as a service Daemon for Windows
- Download Apache Commons’ Daemon package for Windows (make sure to get the Windows package that includes .exe files).
- Copy platform-appropriate prunsrv.exe into the jetty directory and rename it to SolrService.exe – this is the actual Windows service executable.
- Copy prunmgr.exe into a new subdirectory jetty/serviceui and rename it also to SolrService.exe (to provide default service name) – this is the UI that allows to correct some of the parameters of the service after it had been setup via the command line.
- Make sure that computer’s environmental variables have JAVA_HOME defined for system variables, not just for user’s (run sysdm.cpl as Administrator). The variable value should look something like C:\Progra~1\Java\jre7 . Otherwise, attempting to start the service will produce the following message in the daemon/service logs: Unable to find Java Runtime Environment.
- Run the service registration (with renamed prunsrv) as the Administrator on the command prompt after replacing <_SOLRDIR_> with the actual path to the Solr installation as setup above. The command below should be all on a single line (with spaces instead of line breaks):
SolrService.exe //IS//SolrService
--DisplayName="Solr Service"
--Install=<_SOLRDIR_>\jetty\SolrService.exe
--LogPath=<_SOLRDIR_>\jetty\logs
--LogLevel=Debug
--StdOutput=auto
--StdError=auto
--StartMode=java
--StopMode=java
--Jvm=auto
++JvmOptions=-Djetty.home=<_SOLRDIR_>\jetty
++JvmOptions=-DSTOP.PORT=8087
++JvmOptions=-DSTOP.KEY=stopsolr
++JvmOptions=-Djetty.logs=<_SOLRDIR_>\jetty\logs
++JvmOptions=-Dorg.eclipse.jetty.util.log.SOURCE=true
++JvmOptions=-XX:MaxPermSize=128M
--Classpath=<_SOLRDIR_>\jetty\start.jar
--StartClass=org.eclipse.jetty.start.Main
++StartParams=OPTION=ALL
++StartParams=<_SOLRDIR_>\jetty\etc\jetty.xml
--StopClass=org.eclipse.jetty.start.Main
++StopParams=--stop
++JvmOptions=-Dsolr.solr.home=<_SOLRDIR_>
--StartPath=<_SOLRDIR_>\jetty
- Run the service:
- SolrService.exe start
- Check the log files in the log subdirectory (usually commons-daemon.<date>.log) for messages.
- If there is an error message, run serviceui\SolrService.exe and try to correct possible problems. An account that runs the service may need to switch to one with full access to the directories (e.g. Administrator).
- Run SolrService.exe stop to stop the service and try starting again. If error log shows problems with stopping and the Services control panel shows the service as ‘starting’, see the troubleshooting section below on how to kill a run-away service.
- The success criteria here is being able to access Solr’ Web Admin UI from http://localhost:8983/solr (again).
- In the Services control panel, change status of the service Solr Service from manual to automatic to ensure it survives restart. Try stopping and starting the service from the Services control panel to test that it works. Use Solr’ Web Admin UI to verify that it has stopped/started correctly.
Updating Solr configuration
- Update would usually involve changes to schema.xml and – much more rarely – to solrconfig.xml .
- For example in this tutorial we must give the windows path to avoid warning messages
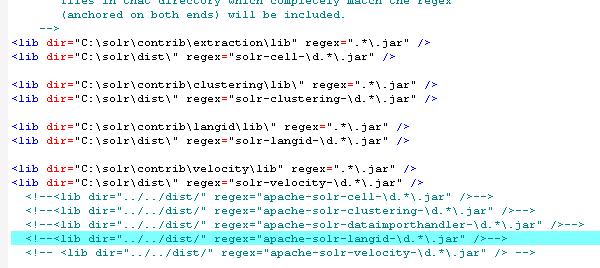
- Most of the time, the core can be reloaded from the Solr’s Web Admin UI to account for the new configuration : we should need to comment the 2 lines <lib dir=$…
- If the changes are significant (e.g. new collection or some deep server settings), the service itself may need to be restarted.
Upgrading Solr
- Download and unpack the latest 4.x version of Solr.
- Stop Solr service.
- Delete and re-copy the directories into jetty subdirectory as per the initial-installation instructions above, with two exceptions:
- Keep logs directory, which contains production logs.
- Delete solr-webapp directory, which is an expanded version of – now obsolete – webapps/solr.war. If this is not done, you will get version mismatch between old and new content. The solr-webapp directory will be regenerated on the next Jetty restart.
- If you need to update schema or config, do it now while the service is down.
- Restart the service.
- If you are running some persistent client, you may need to restart that as well.
- Test from Web Admin UI interface that the service is running.
Troubleshooting service setup
If a service is misconfigured, Java runtime not found or something else goes wrong, you may get a run-away service that refuses to start and stop properly from the control panel. In which case, you may need to use command line tools (possibly as Administrator) to find and kill the stuck service:
- sc queryex
- taskkill /PID <PID> /F
In here, <PID> is the process ID for the solr service that is stuck.
Creating a core in a SolR mulicore instance under Jetty
Using Multiple SolrCores
It is possible to segment Solr into multiple cores, each with its own configuration and indices. Cores may be dedicated to a single application or to very different ones, but all are administered through a common administration interface. You can create new Solr cores on the fly, shutdown cores, even replace one running core with another, all without ever stopping or restarting your servlet container.
Solr cores are configured by placing a file named solr.xml in your solr.home directory. A typical solr.xml looks like this:
<solr persistent=”false”>
<cores adminPath=”/admin/cores” host=”${host:}” hostPort=”${jetty.port:}”>
<core name=”core0″ instanceDir=”core0″ />
<core name=”core1″ instanceDir=”core1″ />
</cores>
</solr>
This sets up two Solr cores, named “core0” and “core1”, and names the directories (relative to the Solr installation path) which will store the configuration and data sub-directories. So you can add core2 by creating a folder core2 and copy the folder data and conf of core0
So the File solr.xml under multicore becomes with one more core (core2) :


