
How to Create a VPN tunnel with Juniper
This tutorial explains a quick setup to create a VPN tunnel between 2 junipers NS5GT devices. Basics are all the same and can be found in pretty much the same spot on different devices. Here are given values:
Site A:
WAN IP: 8.8.8.1/27
LAN IP: 10.10.0.0/22
Site B:
WAN IP: 8.8.9.1/26
LAN IP: 192.168.36.0/24
Steps are identical on both devices, except when you will have to enter WAN and LAN info. So basically you will have to follow the steps below on both devices. I am going to start with the device installed in Site A:
- Expand Policies – Policy Elements – Addresses and click on List.
- With Untrust zone selected, click New.
- Give your site a name and Enter LAN information for Site B in IP box (Site A for device installed in Site B): 192.168.36.0/24. If you don’t know what /24 means simply enter your subnet mask in its entirety (255.255.255.0). Leave zone as Untrust and click OK.
- Now in Addresses screen, select Trust from pull down menu and hit New. Then enter LAN info for the site in which your device is installed (Site A, Site B for device installed in Site B). Same procedure as step 3 above.
- Expand VPNs – AutoKey Advanced and click on Gateway.
- Click New.
- Give your Gateway a name, enter Site B WAN address (Site A for device installed in Site B): 8.8.9.1/26. Leave everything else alone, then click Advanced.
- Enter a preshared key. That’s basically a password to secure communications between the VPN devices. This password should be the same for both Sites A and B.
- Select your local interface on which your VPN tunnel will operate, which is your WAN port. If you’re not sure which port is your WAN, expand Network – Interfaces and click List. Interface assigned to your public IP is the one you need.
- The simplest tunnel will be Predefined, Standard. For more complicated algorithm you can select User Defined, Custom. Since it’s a quick and dirty tutorial we are going to use Predefined.
- Click Return to go back, then click OK.
- Under the same menu (VPNs) click on AutoKey IKE.
- Click New.
- Give your VPN a name, like “Site A to Site B”.
- You should now see “Site B” in Predefined Remote Gateway box – select it.
- Leave everything else in that screen alone and click Advanced.
- If you want VPN monitoring check the box VPN Monitor towards the bottom of the screen. Hit return and then OK.
At this point our VPN tunnel is complete. However, to allow access from one site to the other, we will have to create a policy.
- Expand Policy and click on Policies.
- At top, for “From” field select Untrust and for “To” select Trust from the pull down menus, then hit New.
- Give your policy a name (optional).
- In Source Address, select Site B from pull down menu (Site A for device installed in Site B).
- In Destination, select Site A (Site B for device installed in Site B).
- In action, select Tunnel.
- In Tunnel, select the VPN name you chose in step 14 above.
- If you want to allow bi-directional access, check the box next to Modify matching bidirectional VPN. Leave that box unchecked if you’d like to have a one way policy to allow access from Site A to B, but not the other way around.
- If you want to enable logging, check the appropriate box.
- Click OK.
Now, you’re done. Once you complete the steps in both sites you should be able to ping Site B computers from Site A and vice versa!
Some extra Tips :
1- Do not forget Allow ping and optionally ssh and http between data networks.
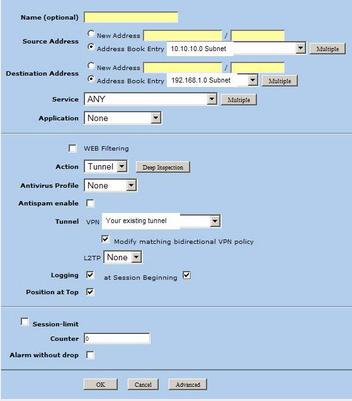
2- Sometimes, You will still need a trust relationship between multiple networks (between 2 sites) as your remote site does not know about the existence of the 2nd subnet, but you can use the existing tunnel between the sites. Did you use a tunnel to create a policy or only created a permit policy? Permit won’t work in policy based tunneling… it has to be a tunnel policy. Create an untrust network for 10.10.10.0 and then create a tunnel policy like this :
3- Useful links :
http://www.trapezenetworks.com/us/en/training/elearning/ssg5-20/content/shell.htm


